Showing posts with label recycling. Show all posts

Monday, September 13, 2010

Re-useable Produce bag

I hope everyone had a wonderful weekend!

Today I wanted to share with you an awesome idea is saw somewhere, at some-point, and it recently resurfaced as I was pawing through my stash to bust through this September.

**Warning pictures for this tutorial were taken in the wee morning hours concluding a bout of "creative" insomnia  (can't sleep sometimes cause I have too many crafting ideas!), so most/all of these pictures are pretty crappy, but you get the point!!**

I have a tiny collection of toole, twill, or toule or whatever the heck you call the stuff. Ya know that half fabric, half mesh, slightly stretchy, tu-tu making, impossible to sew together or fold stuff?!?! Yeah that stuff.  I think I got a yard of it at hobby lobby -in the clearance section - awhile back for maybe 25 cents....I mean COME-ON! 25 cents REALLY?! Surely I can find something to make with it....and that I did.

Why toule? because it is light weight, pretty durable, and wont add unnecessary poundage to your pound dependent fresh fruit and veggies purchases. Plus one less plastic bag in the trash, the better.

Supplies
- a sheet of computer paper (yes paper, believe me)
- 1ish yards of thin ribbon
- safety pin
- toule- less than a 1/4 of a yard with lots of left overs
- sewing machine, thread, scissors, fabric measuring tape, etc.

First cut out two rectangles -- any size you want for produce you buy (I LOVE apples so I made mine "apple" size -- take into consideration longer fruits/veggies like cucumbers).

Fold over a 1 inch casing on the top end of the toule, and pin it to the paper....

Now sew the casing using a medium/small straight stitch....or if you want to get crazy do a zig zag. 


Whats this?! The machine doesn't EAT the toule...no in fact it doesn't, thank you paper :) 


Now carefully tear the paper away using the "perforation" your needle gave it. 

Repeat the casing on your other rectangle, using this fun paper trick.

Then sew up the sides and bottoms of your rectangles, face to face (using your paper) -- be sure not to sew over your casing and close it up!! 

Now flip your "bag" right side out, and grab your ribbon and a safety pin.. 


Starting at one corner thread it all the way through back to the starting point making a drawstring- knot the ends together. Repeat for the other side. 

You're done!


I plan on making many more of these! 

I was even thinking, I could get really nerdy and color code the bags so I remember which produce to buy....green = cucumbers, red = apples, brown = potatoes, white = onions/garlic, pink= tomatoes, oh the possibilities!!

The cashiers here at my HEB already think I'm crazy by bringing 3-4 GIANT nylon shopping bags (from Target, $1 a piece and the fold up into a tiny carrying case!) with me every Sunday. I'll just add a little more crazy to the list when they see all my produce in toule drawstring bags!

I hope you have a fantastically crafty day, 
Now go bust some toule stash! 


Saturday, August 21, 2010

Paper Flowers Part 4

These aren't flowers, per say, but they are definitely flower like. Plus with holidays just around the corner, perhaps a neat way to display some eco-friendly decorations!
Picture borrowed from here

Tuesday, August 10, 2010

T-Shirt Quilt

I started this T-shirt quilt about a year and a half ago, by cutting up all my old high school T-shirts into 14" blocks.....then I didn't know what to do next and they sat in a storage bin. After some coaxing from some fellow crafty and quilty (yes its a word now) ladies, I hunkered down and got it all done in about 3 days, with many breaks in between.

I didn't know I was going to write a semi-tutorial on this...so bare with me, the pictures aren't all here, but I'll try my best to explain things as I go. This makes a T-shirt quilt that is about the size of a twin bed.

First up, Supplies:

  • 24 T-shirts, too precious to throw away, yet taking up space in the closet
  • 9 yards of 20" light/medium weight fuse-able interfacing with left overs
  • 2 yards of 90" batting, mine is natural cotton (with left overs)
  • 2.5 yards of 60" jersey knit material
  • 1 yard of cotton blend material for the border
  • 6 yards of 1 inch double fold bias tape (with left overs)
  • Sewing machine
  • Scissors (this would be a fantastic time to invest in a rotary cutter, ruler, and mat. Believe me your hand will thank you)
  • Matching thread (or at least best you can, I primarily used white or grey thread).
  • Cereal box to make 12.5" square template
  • Ruler
  • Fabric marker

Saturday, July 31, 2010

Newspaper organizer

I hope you are all having a wonderfully crafty Saturday afternoon!!

Today I'm going to share with you a modified tutorial from a book I just recently purchased. One yard Wonders

Find it on Amazon here
I think many of these projects are neat, but the instructions can be quite cryptic. It took me a good 30 minutes of reading and look at the pictures over and over again until it finally sank in what they were trying to 'teach' me.

One of the projects in this book was really interesting, but I don't have easy access to 30" heavy interfacing, the largest interfacing my local hobby store sells is 20"

So I decided to make this out of newspaper, and alter the project a bit to fit my budget and time constraints (another pharmacology exam on Wednesday...eeek!)


Here is my finished project so you can get an idea, each of the squares is about 4" by 4"


First gather your supplies:
- scissors, paper cutter (optional)
- tape
- glue stick
- newspaper
- cereal box
- ruler and marker


Thursday, July 29, 2010

Eco Friendly Gift wraping

What if I told you, you never again have to buy bows, wraping paper, or gift bags again? You would be kinda excited right??

Well here is your solution.

How to make a gift bag out of junk mail here
Small gift box out of a dollar bill here
Cereal box to gift box here

Also don't forget that newspaper is your best friend for wrapping packages, stuffing for shipping boxes, etc. Also think about using multiple pages of a magazine to wrap your gifts. Your gift recipient will think "wow, how creative and unique!"

Now for my favorite part....Gift bows!! These are a delight to make, and the results are amazing!

Here are a few that I made out of a bridal magazine that was destine for the recycle bin...


They turned out much better than I had planned, and with a little practice I was making bows that were nearly perfect!!

Here is a list of supplies you will need:

Monday, July 26, 2010

Paper flowers part 1


I've alluded to this project in some of my other posts, but I wanted to really show case it. Over the next few days I'm going to show you all the different types of paper flower's I've mastered--most of which I learned from other people's blogs/websites. No worries I'll give credit where credit is due :)

This is a great tutorial to use with old magazines, newspapers, old class notes (which I'm totally guilty of), junk mail, etc. Any source of paper, that is preferably in the "recycled" category. Plus I think they make great conversation pieces instead of folding these out of regular ole non-interesting-excessive tree killing paper.


Sunday, July 25, 2010

Newspaper basket

Good morning all!

I hope you are having a wonderful weekend!

Today I'm going to share with you an awesome tutorial I discovered a while back. Its a great way to make something useful, recycled, and a definite conversation piece!

Supplies:

Newspaper, scissors, stapler, mod podge, and anything you may want to decorate your basket with: ribbon, gems, paint, etc.

The small "test" basket

Saturday, July 24, 2010

Interfacing, Zippers, and Gussets OH MY!


The three words to make any seamstress cringe. I myself used to cringe at these words…but after a making a few of these handy dandy zipper bags I have conquered my fear!

This is a long tutorial beware!!

How many of you have a T-shirt in your closet that you haven’t worn in 6+ months because it is too short, tight, small, or has a stain on it?!?!? Well I have about a half a dozen of these taking up valuable space and hangers.

My solution: refashion them into useful items. Today’s Post is how to make a zipper bag (make up bag size) out of a T-shirt.

Supplies:
-One T-shirt you no longer wear
-A bit of coordinating fabric for the liner (1/4 yard with lots of leftovers)
-7” closed coil zipper
-Light weight fuse-able interfacing (1 yard, with left overs)
-Iron
-Sewing machine, matching thread, seam ripper, zipper foot, fabric scissors, straight pins
-Surger (completely optional)
-Ruler and pen/pencil/fabric marker
-Wax paper (to make your pattern)

How many of you ladies out there have make up bags that look like this???

stuffed full, zipper wont close, and that darn brush just doesn't fit!!

How about making an T-shirt into this:

Thursday, July 22, 2010

Phone books!!

So how many phone books do you have at your house? I managed to acquire 3 in less than 6 months. There always seems to be a new one arriving at my door, or a pile of them at the mail box room at my apartment complex

Who even uses a phone book anymore?!?! When you can hop online and look it up, if your fancy you have an iphone, or you can be like me and "text message" google (466453) when you are on the go and get an instant reply. Say I'm running errands and I want to make a call to (fill in the blank) but i'm not fancy and have an Iphone, so I text message google: fill in the blank, Laredo, TX....a few seconds later = all local listings with addresses and phone numbers! Easy as pie, and it doesn't cost a thing except for maybe a regular text message charge.

Anyways back on topic...phonebooks, and having too many of them.

This was by far my favorite thing to do with a phone book...but oh the possibilities!


Friday, July 16, 2010

Upcycled Magazines

Okay, tonights topic is RECYCLE!!!  

Everyone has a few magazines laying around, collecting dust, and holding down your coffee table, book shelf, or other random spot. Put that magazine to good use!!

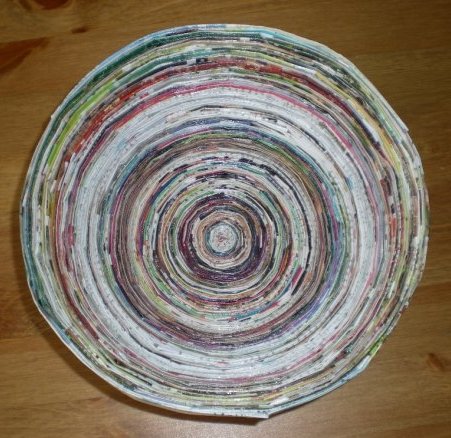
My favorite, yet slightly time consuming, thing to do with old magazines is make bowls...yes that is right bowls.

Here is a few pictures of a completed magazine bowl:

This bowl was made by using two Cosmo magazines, it now lives at my friends house as a birthday gift. It is a great conversation piece!


Supplies:


+     1-2 magazines that are close to the same width
+     Scotch tape
+     Mod-podge (I prefer glossy)
+    A little wax paper
+    Bowl to form your magazine.


Related Posts with Thumbnails